Extending the Web with Android Instant Apps
During I/O 2016, Google announced it was developing a new way to bridge the gap between the web and native apps, by making them as easy to access as a simple click in a link: Instant Apps, made of small data-chunks that can be temporarily loaded on the device with no extra going-to-the-Play-Store steps.
Selected developers started adapting their apps to the new format shortly after: the feature rollout will happen in stages, beginning a small set of devices and starting on Android Marshmallow and above.
In this post, I'll introduce a little of my experience with the Instant Apps SDK and provide some insights while tinkering with the code. Hopefully this will be helpful in migrating your existing application.
Preparing the project
Earlier this year, Google released a list of steps to help you prepare your app to supporting Instant App experiences. The initial steps should be already covered by your application at this moment: support Android Marshmallow's runtime permissions and deep links to enable URL-based navigation (Android Studio can help with that!).
Take into account that if your app requires logging in, you'll also have to integrate the SmartLock API for Passwords. Also you can use the new Payments API to a include checkout flow (Google currently has partnerships with Vantiv, Braintree and Stripe, but more to come).
The most complicated step might be modularizing your application as each downloaded module on a cold start should have less than 4MB, both for business (users on a mobile network might not be able to download bigger files) and technical reasons (Google's CDN is optimized to distributing files up to 4MB in size).
You can also have 2 versions of your app: Full App & Instant App. However, this is rather discouraged by Google. Ideally your instant app should have a subset of features of your full app.
Features or APK splits
The Instant Apps SDK introduced the concept of APK splits (also called features - not to be confused with this kind of split), that represents each module of your application. Android is able to download each of these features based on the accessed deep link — as long as there is at least one activity in the application that handles the URL.
Those modules are kept in a device-wide shared LRU-cache for future usage. Eventually, if the user accesses an URL that is not present in-cache, then the new download gets triggered.
If your app contains more than one single feature, then those will be bundled in a zip file also known as APK Bundle, which basically wraps everything for easier publishing.
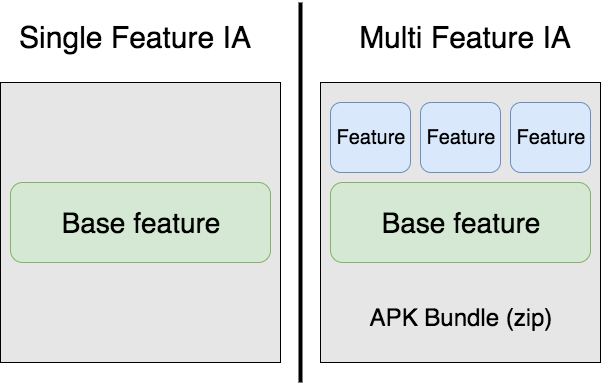
Notice the size limit of 4 MB applies to the entire downloaded feature, including its dependencies. So if your base module (let's say, general-usage libraries and resources) already accounts for 3.5 MB, you're going to have a bad time delivering your app. Make sure your modules are lean: you can use one of many tools to help you out in this task, like ApkAnalyzer.
Building your first feature
In reality, features are just "pointers to libraries with a naming convention for unique identification". Android infers the dependency graph as shown in the below example:
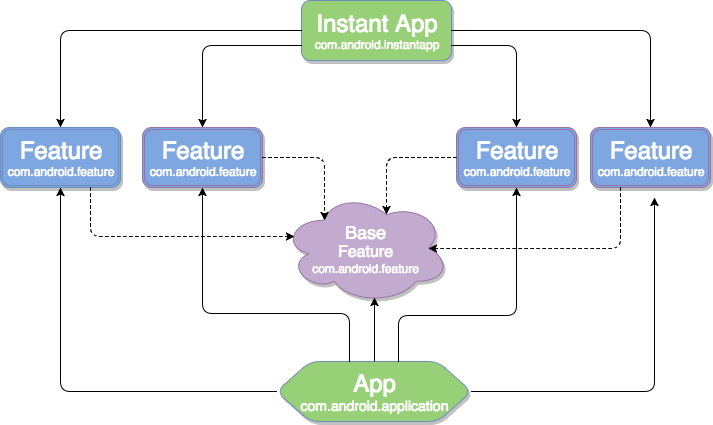
Notice how a feature might depend on one or more libraries, and the libraries themselves might depend on other libraries (#mindblown). All features of the application must depend on the base feature, as that is the module that will contain the wiring of the instant app and also the definition of the deep links' URLs (more about that in the next section).
For each of your features, you'll need to add a module to your project, containing just a manifest with your Activity declarations and a build.gradle file that applies the com.android.feature plugin (or you can do it via Android Studio's wizards):
apply plugin: 'com.android.feature'

android {
  ...
}
<?xml version="1.0" encoding="utf-8"?>
<manifest package="com.sample.instantsonar.artists"
xmlns:android="http://schemas.android.com/apk/res/android">
<application>
<activity
android:name=".ArtistsActivity"
android:theme="@style/AppTheme">
<intent-filter>
<action android:name="android.intent.action.MAIN" />
<category android:name="android.intent.category.LAUNCHER" />
</intent-filter>
<intent-filter
android:autoVerify="true"
android:order="1">
<action android:name="android.intent.action.VIEW" />
<category android:name="android.intent.category.BROWSABLE" />
<category android:name="android.intent.category.DEFAULT" />
<data android:host="instantsonar.com" />
<data android:pathPrefix="/artist" />
<data android:scheme="https" />
<data android:scheme="http" />
</intent-filter>
<meta-data
android:name="default-url"
android:value="https://instantsonar.com/artist" />
</activity>
</application>
</manifest>Notice the IntentFilter I have declared to the activity. This is the definition of the deep links that will be handled by the Instant App: the feature that contains ArtistsActivity will be downloaded when https://instantsonar.com/artist (also for http) is accessed (as declared with the pathPrefix attribute, so it won't conflict with the other declared links).
In case your app declares more than one activity to match a given URL, the android:order attribute is the one that will define which will handle it (that parameter is optional and defaults to zero): for example, if you have an activity that declares the URL path /artist and another with /artist/*, when receiving a request from https://instantsonar.com/artist/42, Google Play will pick the activity with the lowest android:order value.
Another important aspect of the manifest are the <metadata> tags defining Default URLs. For each CATEGORY_LAUNCHER / ACTION_MAIN activity, you need to define a sibling default-url tag that will enable Play Store discovery and integration with Launchers.
Base feature
Your base library contains all the code necessary to run the core functionality of your application, so this is the place where you'd set the shared resources/assets and dependencies on libraries (as the support library and your preferred libraries for networking, dependency injection, analytics, crash reporting, testing, etc). All your features must depend on this base one: always take in account the size of those dependencies to not bloat your instant app's modules!
It is also the place where the declaration of your full application will reside, thus propagating the applicationId to all features in the project.
In order to differentiate the base feature from the others, all you need to do is to set a gradle attribute. The base feature build.gradle file will look something like:
apply plugin: 'com.android.feature

android {
    ...

    baseFeature true
  }

  feature project(':feature1')
  feature project(':feature2')
}
And its manifest file will be very simple, just containing permission declarations and shared activities (if that's the case for your project). Later on, the manifest merger tool will also aggregate all your module's manifest files:
<manifest package="com.sample.instantsonar.base"
    xmlns:android="http://schemas.android.com/apk/res/android">

    <uses-permission android:name="android.permission.INTERNET" />

    <application
        android:allowBackup="true"
        android:label="@string/app_name"
        android:name="com.sample.instantsonar.SampleApplication">

        <!-- shared activities here (only if you need!) -->
    </application>

</manifest>
APK Bundle
Building the APK Bundle is the simplest part of the process: all you need is to create a new module that contains a gradle file that will instruct how your bundle will be assembled.
Make sure you declare com.android.instantapp as the build plugin, and refer to all your features in the dependencies block.
Generally, the file will have a similar structure as this one:
apply plugin: 'com.android.instantapp'

dependencies {
  implementation project(':base')
  implementation project(':feature1')
  implementation project(':feature2')
}
This article was written during the early days of Android Instant Apps. The technology has since evolved into Android App Bundles and Dynamic Feature Modules.